IDF M-51 SHERMAN TANK IN 1/35TH SCALE
Kit-bashing two tank models from 3 kits.
PART-1 THE M-51

Kit-bashing two tank models from 3 kits.
PART-1 THE M-51

Background
After my last aircraft build (see the RF-4E post) I needed some time to "decompress". So, I built some armor. Unlike 1/32 aircraft, an armor build can take as much or as little time as you care to invest in it. The satisfaction of a successful build is not a distant goal as it can be in an extensive aircraft project. For this reason I try to intersperse armor between aircraft modeling. I hadn't decided yet what I'd pull out of stash, but as it turned out this project came together at just the right time. I was at an IPMS competition and the model vendors had some interesting stuff for sale at very reasonable prices. In the end, I picked up 3 kits for about $60 total outlay. They were: Dragon "Premium" M-51, Academy M-51, MP Models M-50 and a Verlinden 3 piece transmission casing in resin. And so, the fun began......


Moving along nicely now, I assembled the HVSS suspension and road-wheels from the Dragon premium kit which of course assembled well to the Dragon hull. I have to say that these are really fiddly little assemblies and could have been engineered with half as many parts to achieve the same result. I guess high parts count is the way that most higher end premium kits justify the expense. I mounted the DS track to check fit and again all was well.


Starting off: The M-51
The first thing to do was decide which parts, from which of the kits would combine the best and fit well enough to replicate an IDF M-51 (Sherman M4A3) with a cast hull........... but this one was special. It had a 3-part transmission casing which was a unique combination and in hundreds of photos of IDF M-51s that I checked for references, this was the only M-51 constructed in this way. Here are the photos of that particular tank as it appeared during the 1973 Yom Kippur war. Luckily all the markings were visible in the photos so no need to guess.


HULL & ENGINE DECK
I used the Dragon M-51 "Isherman" (misnomer) cast hull. The part was well detailed and I liked the cast steel texture better than the Academy kit which (to my eye) looked too uniform and unrealistic. So to begin, I used the engine deck (early version) that was included in the MP Models M-50 M4A4 kit. It wasn't an exact fit as it was made to fit a longer hull, so I shortened it and shimmed it all around with styrene strip for a good fit. I used "Apoxie" putty to replicate weld seams where appropriate.


Next thing to do was to fit the "Verlinden" resin, 3-piece transmission casing. Some minor adjustments and I was satisfied with the fit on that as well.

This photo shows it finished and secured in position with a line of added bolt heads across the top made from styrene hex stock.

The Academy sprockets were a best fit to the resin conversion part and also to the one piece "DS" tracks provided in the Dragon kit. These were attached after a few more minor adjustments by the addition of an appropriate spindle (5mm styrene round stock) to hold the sprocket to the gear casing.


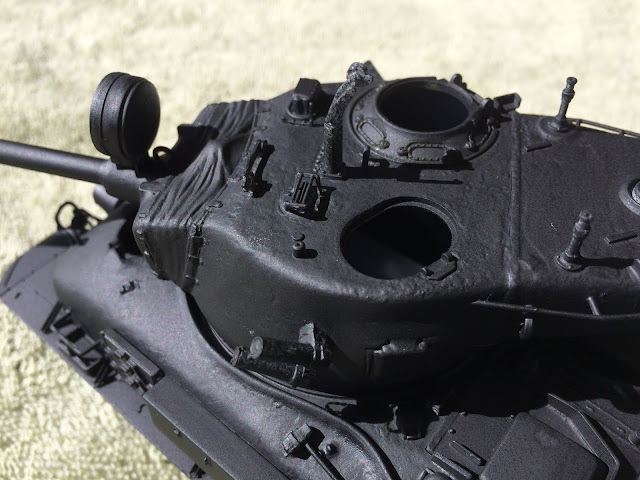
The last photo shows that I used the Dragon turret, mantlet and metal barrel from the M-51 kit. The spent shell casing hatch was glued in place and then blended in with Apoxie putty. I love that stuff. I used the commanders cupola from the Academy M-51 kit. You can see in this photo that some of the metal-etched parts from the Dragon kit were applied around the mantlet cover and these dress up that area pretty well. The muzzle blast deflector on the M-51 is a strange beast which adds an aggressive appearance to the M-51 compared to earlier Sherman tanks in the IDF. There is some contention as to the size of this assembly in 1/35th scale. You can see in these photos a marked difference as to how it should look from one kit compared to the other. i went with the Dragon kit offering (in Grey) The Academy part (in tan plastic) looked way oversize to my eye.


Next the fenders, jerry-can holders, spare tracks and roadwheels, tools and tool boxes were attached all coming from the Dragon M-51 kit. Nice fender supports (in photo-etch metal) were included in the Dragon premium kit. They were easy to bend and attach.


PAINT
I base coated the entire model in flat black paint which is my usual method. Following up with "Mission Models" IDF SandGrey, version 1, acrylic paint.


The model was pin-washed and streaked with some light chipping all applied by brush. The figures are "MiniArt" US Tank Crew #35126. I painted and lightly converted these figures with Apoxie putty to replicate Israeli tankers from the 1960s-70s.


FINALE
So there you have it. This should really be called "part one" of the "kit-bash" because with all the left-over parts I built a second IDF Sherman, an M-50. I'll post again with that build and finishing of that model next.
