ISRAELI F-4E IN SOUTHEAST ASIA CAMOUFLAGE


Yom Kippur War: Week 1 Oct. 06-12, 1973
The Israeli Air Force attempted to achieve air superiority in the first days of the 1973 Yom Kippur war. It was a costly effort in pilots and aircraft. With the war raging on two fronts, Egyptians in the south and Syrians in the north, the country's stockpiles of ammunition and reserve equipment was quickly being diminished. The United States responded by initiating a massive airlift of ammunition, armored vehicles, and artillery. Combat aircraft, F-4E Phantom II and A4 Skyhawk jets were flown directly from USAF and Navy squadrons in the USA to replenish the Israeli losses.


The USAF flew in 34 F-4E Phantom II aircraft direct from squadrons in the USA. These aircraft began arriving after Oct. 13th, the second week of the Yom Kippur war. All were painted in the standard color scheme of the USAF at the time: SEA (South-East Asia).
The photos below show a few of these aircraft as they arrived. They were checked out quickly by the IAF aircraft maintenance unit, all the USAF insignia was removed and Israeli six point star roundels painted on. Most of these 34 aircraft were from newer production blocks and equipped with leading edge slats and TISEO ( Target ID System, Electro Optical). In addition, some new guided weapons were sent along to equip these newer aircraft. The AGM-65 "Maverick" missiles were the most publicized at the time, but other more powerful missiles also arrived which took the Phantom force to another level of usefulness that would become apparent nine years later in the first Lebanon war.


The aircraft arrived, were accepted, Israeli roundels painted on and within hours put into combat.


THE MODEL
I decided with the new color scheme to do something different this time. I like to include extensive details in a pre-flight condition as an aircraft would appear on the ground. This time however, I wanted to do an "In-flight" model and close the landing gear doors, and cockpit canopies. I chose the Revell Phantom II F-4G in 1/32nd scale kit for two reasons, the cost which was significantly less expensive than the Tamiya F-4E and the fact that most of the detail parts in a Tamiya kit would not be used. Of course some good looking pilot figures would be required, which luckily were in the spare parts box from prior Tamiya Phantom builds. Since a focus would be the area around those little white helmets, I would try to replicate the look as realistically as possible, taking into account the base model is quite sparse on cockpit detail. Luckily, I had quite a few parts left over from prior F-4 builds when I used resin cockpits and photo-etch to substitute kit parts to dress-up the very scant cockpit of the Revell kit. Problems: The Revell F-4 nose is too narrow and sharp looking in profile, so I decided to replace it with a conversion piece from AMS Resin specifically meant to address this issue. Seamless intakes were also included in the plan as the internal geometry of the kit intake trunks are nothing like the actual aircraft. With all this going on, my little project (which I thought would go quick and easy)evolved into a major undertaking. Trying to get all the aftermarket resin parts to fit onto the base kit. Needless to say, you should always expect the unexpected...So, all that being said, here are photos from the beginning of this project.

Replacement radome required removal of cannon fairing to spread fuselage.


Seamless Intakes require removal of sections of plastic from kit fuselage parts


Replacement intakes are in position and test fitted.


Cockpit area being detailed with spare parts from Tamiya kit and resin from Avionix.


Pilots are from a Tamiya F-4 kit and resin ejection seats are from Avionix


After painting the cockpit instrument panels, consoles and sidewalls


Pilots after painting


Pilots are in position and I can finally start building an airplane model....


First Painting Session, black primer overall and small areas of camouflage paint around the cockpit. This Computer Graphic is basically how I've decided the finished model will appear.

I took some time to replicate the TISEO leading edge target acquisition camera located on the left wing inboard flap. None of the 1/32nd scale kits (Revell or Tamiya) feature this device. This equipped more than half of the newer block aircraft that arrived during the 1973 war from USAF squadrons. A plastic ball point pen body was perfectly sized. After shaping the piece to fit over top of the leading edge it was glued in position and filled halfway with epoxy putty. I then added some internal details with MV lenses to the inside and tinted the large reflector with Tamiya clear blue paint. There is at least one aftermarket flap set that includes this fairing but I didn't have it at the start of the project so I scratch-built my own.


I tinted the center panel of the forward windscreen a light green shade, as on an actual F-4E. This was accomplished by mixing a small amount of Tamiya acrylic paints and hand painting with a wide brush stroke. The colors were: Clear green #X-25 & Clear #X-22. No specific formula, just mixed few drops of each until I had a nice tint. I kept applying my mix to a scrap of clear plastic until I had it just right....


Final paint scheme prior to application of decals


The In-flight refueling probe (designed by IAI, Israel Aircraft Industries) was added to the replacement aircraft after hostilities ended. The program carried on for about 15 years to install this feature on the entire fleet of IAF Kurnass aircraft. The resin add-on part was purchased from "Isradecal Studios", an Israeli scale model accessory, decals and publications company. The item was a perfect fit and I waited until most of the handling of the model was complete before attaching the delicate probe. The part in the photo shows how the probe connects to the forward fuel tank.


Now the fun part...for me anyway. Stencils ! My problem is finding another full stencil sheet for this model which has proved impossible. I should have bought 10 Isradecal sets when they were available....Grrrrrrr. Anyway, I had a 20 year old set from "Aeromaster" and they were barely usable but in the end I managed to position a fair amount without breaking. This is what it looks like now.


Underwing stores: GBU-15V from Trumpeter, kit AIM-7 Sparrows, Kit AN/ALQ-119 ECM pod, Scratch built Data link pod (per photos from my Israeli friends), AIM-9D Sidewinder kit-bashed from various sources. The weapons pylon for the AIM-9D was cobbled together from sheet plastic and some parts from the Tamiya F-4E kit.

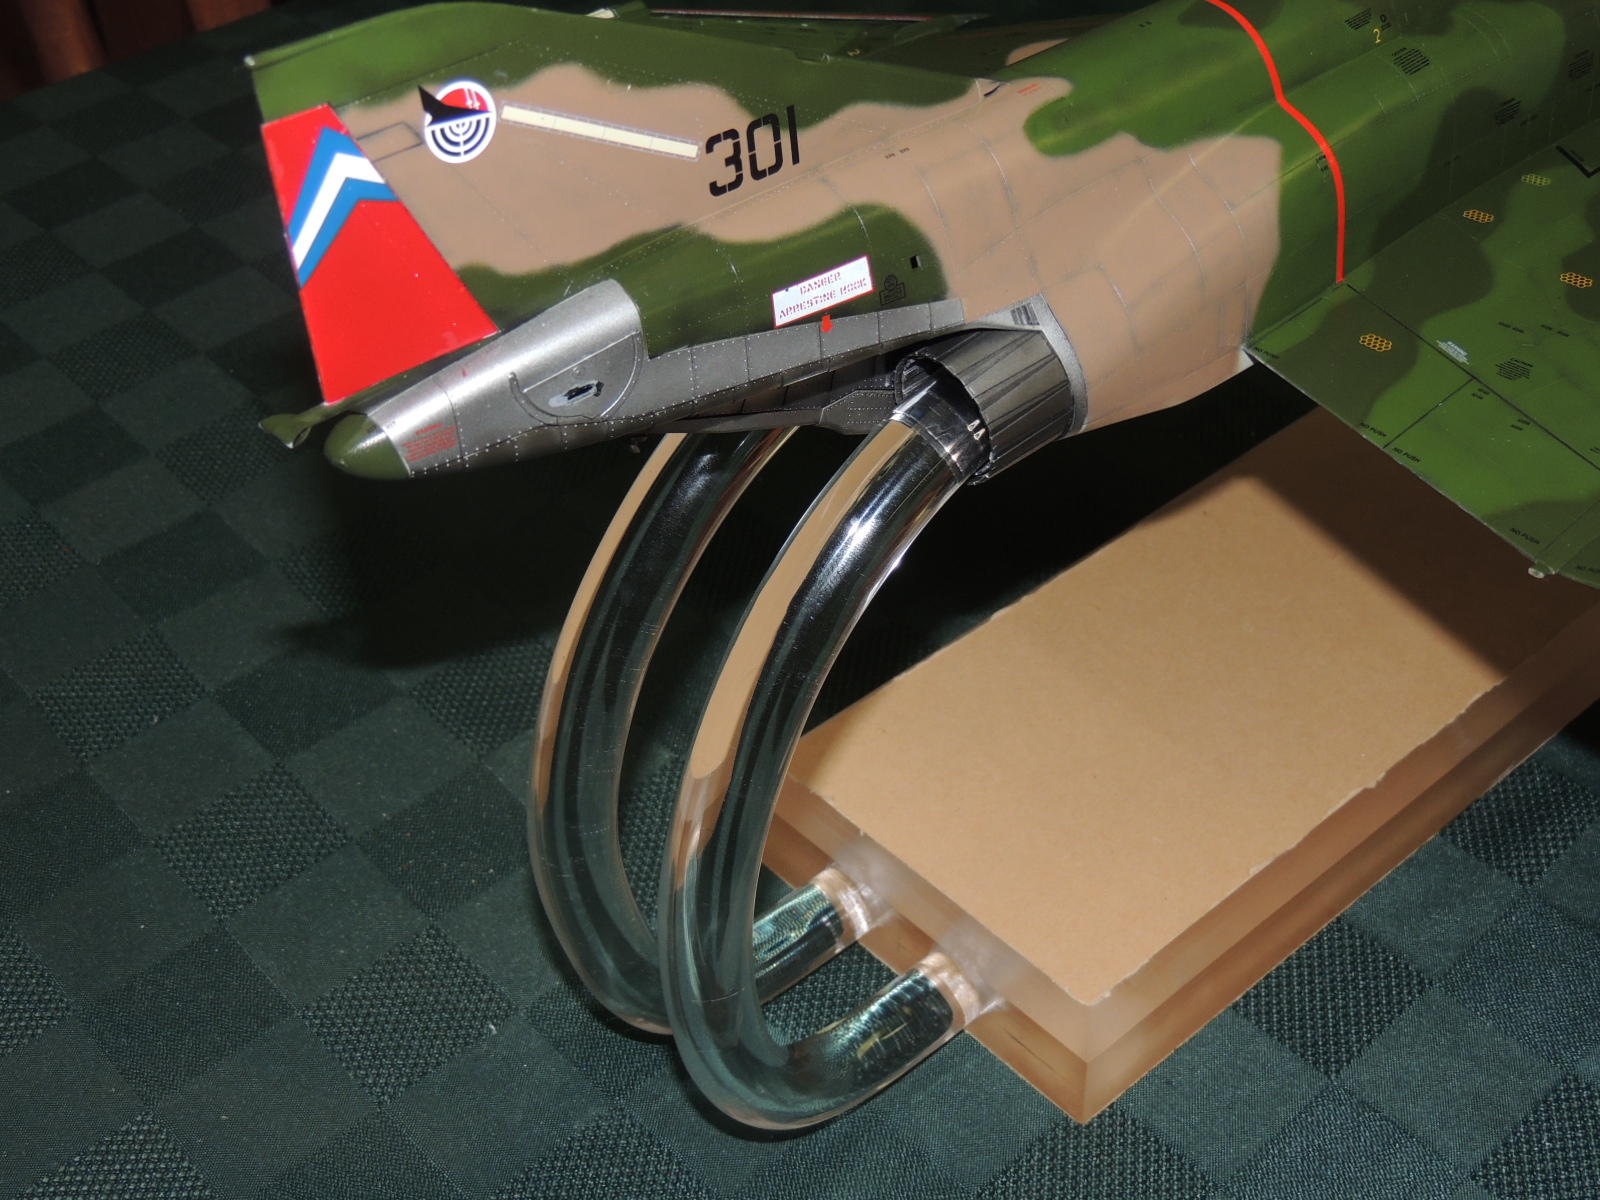
And now I have a stand. This is 3/4" inch acrylic rod which I bent arou nd with a heat gun. Each rod fits exactly into the exhaust nozzle. The base is a heavy block of acrylic weighing over a kilo.

Here was the nerve wracking stage of building this model. It always makes me cringe to do this. Applying thinned raw umber oil paint to express and define the panel lines. When it's all removed, the lines standout very nicely and it all becomes worthwhile. So, I'll probably do it again on the next model.


THE FINISH.................4 MONTHS LATER..


COMMISSIONS
Yes, I will build commissioned scale models for select clients. I can be reached by email: seahors1@gate.net