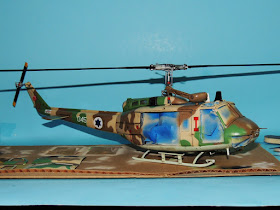
The Bell UH-1 Iroquois (the civilian version is the Bell-205) is a military helicopter powered by a single turbo-shaft engine, with two-bladed main and tail rotors. The helicopter was developed by Bell Helicopter to meet the United States Army's requirement for a medical evacuation and utility helicopter in 1952, and it first flew on 20 October 1956. Ordered into production in March 1960, the UH-1 was the first turbine-powered helicopter to enter production for the United States military, and more than 16,000 have been built.
The first combat operation of the UH-1 was in the service of the U.S. Army during the Vietnam war. The original designation of HU-1 led to the helicopter's nickname of Huey. In September 1962, the designation was changed to UH-1, but "Huey" remained in common use. Approximately 7,000 UH-1 aircraft saw service in Vietnam.
The first AB-205 sold to Israel were provided from the Italian aircraft manufacturer "Agusta" and these arrived in December 1967. They replaced the Sikorski S-58 which was the standard medium utility helicopter at the time. Later deliveries of this type came directly from Bell, USA. Israel finally withdrew its UH-1s from service in 2002, after thirty three years of service. They were replaced by Sikorsky UH-60 Blackhawk helicopters. The Bell-205 served with 2 Israeli Air Force squadrons.
123 squadron badge
124 squadron badge
The Revell 1/32 scale "UH-1D Huey Gunship" has been reissued numerous times over the years with different decal markings and equipment. The first molding was released in 1967. The kit is typical Revell of this era. Sparse detail overall and with age, the moldings have flash around the edges. However, it's a good base kit to work with and a modeler with decent scratch-building skills can be upgrade this kit to competition standards.
I wanted a large scale model helo to add to my IAF model collection but the kits in this scale are few. I have the old "Heller" Super Frelon, but it's really a VERY large model and too big for my display cabinet. The Bell 205 however was a perfect choice as it was a very common helicopter in IDF/IAF service, it also has a 2-blade rotor which will be convenient for display. Starting a build like this requires extensive photo references so that's where I started, gathering photos into an easily accessible file. I'll update with pics of the build as it goes along. I'm hoping that starting this blog page early in the process will motivate me to finish this one up to a high standard. We'll see how it goes.........
Starting out on an old Revell kit is always a full session of clean-up. I took the sanding sticks out and removed every bit of flash and unwanted protrusions from all the mold edges. I then took a good look at my photos to see what could be dressed up. In order to actually complete any model of higher detail, I always create a detail "boundary" so that I won't spend a lot of time working on areas that won't be seen from most angles. I try to imagine the model from each viewing angle and from there I can decide what areas won't be visible, so no need to work too hard in those places. Here you can see the UH-1D engine exhaust. Looking into the end of the pipe, the compressor fan is very visible. So I put one from my spare parts box inside. That's the philosophy, more or less.......By the way those six sticks pointing inward towards the fan cap are igniters...like in a barbecue grill. They make the same clicking sound. I'll add these later.
Some progress photos !! I didn't work on the model for a week or so, but decided to build up some of the cabin framing and to make some minor adjustments to the layout of the overhead instrument panels. My plan has developed somewhat from when I started this project and now I plan to include a full Israeli army infantry squad. That's another entire project to cobble together before this one is done. I'll update when I've made some progress.
The AB-205, which is the Italian manufactured version of the Bell-205 has a rescue winch located on the top of the fuselage above the Right side main cabin door. I'll scratch build that next and mount that on top. Here are photos of the winch:
Here's my winch after a few hours of fiddling with epoxy putty and strip styrene
Next part of the project is the underbelly radiator and more cabin stuff.
CABIN STUFF
I took some time to detail the back side of the Instrument panel because as I go along with the build, I frequently dry-assemble the fuselage halves to check on alignment. I saw that if the model was viewed from one particular angle, the back of the panel could be seen and it was bare-naked. So I glued styrene rounds behind each instrument and drilled a center-hole to accept a cable. Probably no one, ever, will notice....
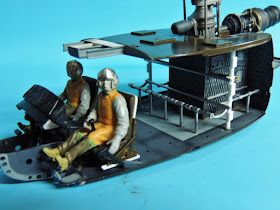
All the while the helicopter build is going on, I've got a sub-project going and that is the crew members. Figure cobbling can be fun if you have enough left over body parts from past kits in your spare parts stash. Laying out all the arms, legs, heads and torsos reminds of a horrible plane crash but "Dr. Frankenstein" is resurrecting some of them...
Here are the Cabin crew and pilots. I leave the arms and heads off until I figure out who goes where and how these parts will interact with each-other.
Here are the Cabin crew and pilots. I leave the arms and heads off until I figure out who goes where and how these parts will interact with each-other.
I made hair for my little people with "Green stuff" putty. Bald head figures are the best to use for these figures. Couple of very tiny blobs of putty, a tooth-pick and a needle make some interesting hairstyles. I tried to replicate the appearance of a typical young Israeli soldier, curly hair and a little longer for veteran Israeli soldiers in a Recon unit.
Here is the crew-chief. Doesn't look like much now, but strapped in behind a MAG machinegun, painted up, he'll be ready to go.....

PILOTS
More Fuselage
Under some Israeli Bell-205s, there is a modification for (?) "engine transmission cooling" (wild guess). I'll stick with that explanation until I'm corrected. Anyway, what this involved was cutting a square opening under the fuselage and box it in with plastic card stock. There was a large protrusion just forward of where I wanted to put my radiator and this had to be cut away and sheeted over first, explaining all the mess you see here...
Here's the actual gizmo on a preserved Bell-205 in the Hatzerim Air Force museum in Israel
I started on the cabin seating and this involved cutting a lot of small pieces of aluminum tubing to replicate the frames. Tedious, but a nice result in the end. My commando soldiers are nearly done and the pilots are ready to be strapped in and fixed in position after painting. This model is interesting because the interior and all the figures need to be in place before I can start on the fuselage. Meanwhile numerous sub-assemblies are going together so they can all be put together at the same time.
A little bit of figure painting over the weekend is bringing the project more to life. I'm anxious to start on the fuselage as there is a hell of seam to fill along it's entire length. I want that to be done soon so I can get into the paint and markings, always my favorite part of the build.
I couldn't leave the rotor mast head the way it was in the kit, so another evening spent staring at tiny pieces of plastic and brass rod, trying to figure out where to start. The detailing is so very basic that it is nearly a complete scratch-build of this part.. Here's a photo of what it looked like before any detailing:
And this what I came up with for my effort. I know I could have gone crazy rebuilding this part, but there are so many little areas in this kit that need the same attention, I had to limit my efforts in some places to keep the project moving along. The large stabilizer casting on top of the rotor head was hollowed out, and this area gets the small linkages for the pitch control rods....I'm guessing the technical part description, as helicopters are VERY different from fixed wing aircraft and have they have completely different terminology for these machines.
More to come......
Infantry squad completed
I had some time over this past weekend to finally get the fuselage halves together and putty the seams. This went pretty easy as I had pre-sanded all the mating surfaces and there is only one longitudinal seam to fill in. The trick is to avoid eliminating the embossed detail on the plastic while sanding. Some masking tape along the seam helped to keep the putty from spreading too far. Makes the sanding a lot easier. So here's where I'm at right now.
I had some time this weekend to put on the first coats of paint. I always apply a general pattern according to my references and then tune it up with subsequent touching up. Here's the result.
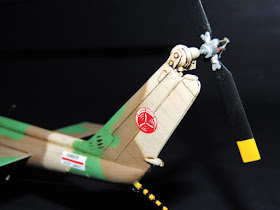
Here she is after a clear gloss coat and the Israeli Air Force decals applied. The paint pattern was tightened up with careful edge of thinned paint. The delineation between colors was very sharp on the original helicopter.
Here it is after all the little stuff had been added and all the clear coats and cabin windows applied. This project took more time than usual mainly because of the simplified details which was the usual engineering of 1/32 Revell kits from the 1960s-70s. In general these kits have a good overall shape and with extra attention the scale modeler could finish up with a very nice end result.
Now to make a space for this one in the display cabinet and the next project is already on the bench.....hint: "It doesn't fly.."
COMMISSIONS
Yes, I will build commissioned scale models for select clients. I can be reached by email: seahors1@gate.net


Beautiful job again Ed. That scratch built crane is inspired.
ReplyDeleteThanks for posting this! Doing an old Esci 1/72and want to mimic this scheme. Very nice work.
ReplyDelete